Craft the Ultimate Cookies & Cream Ice Cream with Just 5 Simple Ingredients
There's a universally loved dessert that evokes childhood memories, brings smiles to faces, and perfectly balances creamy sweetness with delightful crunch: cookies and cream ice cream. While countless commercial versions line freezer aisles, none quite capture the pure joy and superior quality of a homemade batch. Imagine a rich, velvety vanilla base generously studded with an abundance of chocolate sandwich cookies – more cookies than any store-bought pint dares to offer. What if we told you this decadent delight could be yours, crafted with just five simple ingredients and a no-fuss, no-cook method? Get ready to transform your kitchen into an artisanal ice cream parlor and discover how easy it is to create the ultimate homemade
ultra-creamy cookies and cream ice cream that will have everyone asking for more.
Why Homemade Cookies and Cream Ice Cream Reigns Supreme
The allure of homemade
cookies and cream ice cream extends far beyond mere cost savings; it’s about taking control of your ingredients and elevating the dessert experience. For years, we’ve been conditioned to accept store-bought versions laden with stabilizers, artificial flavors, and ingredients that require a chemistry degree to pronounce, like soy lecithin and high fructose corn syrup. Frankly, if you’re indulging in a treat, it should be made with real, wholesome components.
This homemade approach celebrates simplicity and quality. By opting for a no-cook vanilla base, you bypass the need for egg yolks and stovetop custards, simplifying the process without sacrificing an ounce of flavor or texture. The real magic, however, lies in the freedom to customize. You dictate the cookie-to-cream ratio – and let's be honest, most of us want *more* cookies! We're talking about a generous abundance of chopped chocolate sandwich cookies, ensuring every single spoonful is packed with that signature crunchy, chewy, and creamy goodness. The superior richness comes from real heavy cream and whole milk, which are often replaced by lower-fat, less satisfying alternatives in commercial products. While churning your own ice cream in a machine might add a few extra minutes to the process compared to no-churn recipes, the resulting ultra-creamy, melt-in-your-mouth texture is absolutely worth it. It’s a texture that simply can’t be replicated by shortcut methods.
The Magic Five: Essential Ingredients for Ultimate Creaminess
The beauty of this recipe lies in its elegant simplicity. With just five carefully chosen ingredients, you can create a creamy, cookie-studded dessert that genuinely rivals, and often surpasses, anything you’d find in a gourmet shop. Each ingredient plays a crucial role in achieving that perfect balance of flavor and texture in your homemade
cookies and cream ice cream.
- Whole Milk: This isn't just liquid; it provides the essential body and structure for your ice cream. The fat content in whole milk helps to balance the richness of the heavy cream and aids in dissolving the granulated sugar smoothly. While you *can* use lower-fat milk, be warned: doing so will likely result in a less creamy, potentially icier final product. Stick with whole milk for that luscious, smooth consistency.
- Granulated Sugar: Beyond merely sweetening the base, granulated sugar is a critical component for texture. Sugar acts as an anti-freeze, lowering the freezing point of the mixture. This prevents the formation of large ice crystals, which would lead to a hard, icy texture, and instead helps the ice cream remain soft enough to scoop after freezing. It's the secret to that perfectly scoopable consistency.
- Heavy Cream: This is arguably the most important ingredient for achieving that luxurious, velvety mouthfeel. Heavy cream, with its high fat content (typically 36% or more), is what gives your ice cream its characteristic richness and creamy texture. It creates a smooth, decadent scoop that melts beautifully on your tongue. Do not skimp on the heavy cream if you desire an authentically rich cookies and cream ice cream.
- Pure Vanilla Extract: A splash of high-quality pure vanilla extract is essential for adding a warm, aromatic depth to the vanilla base. While it might seem like a small detail, vanilla enhances and rounds out all the other flavors, giving the ice cream a more complex and appealing profile. Don’t confuse it with imitation vanilla; pure extract makes a noticeable difference.
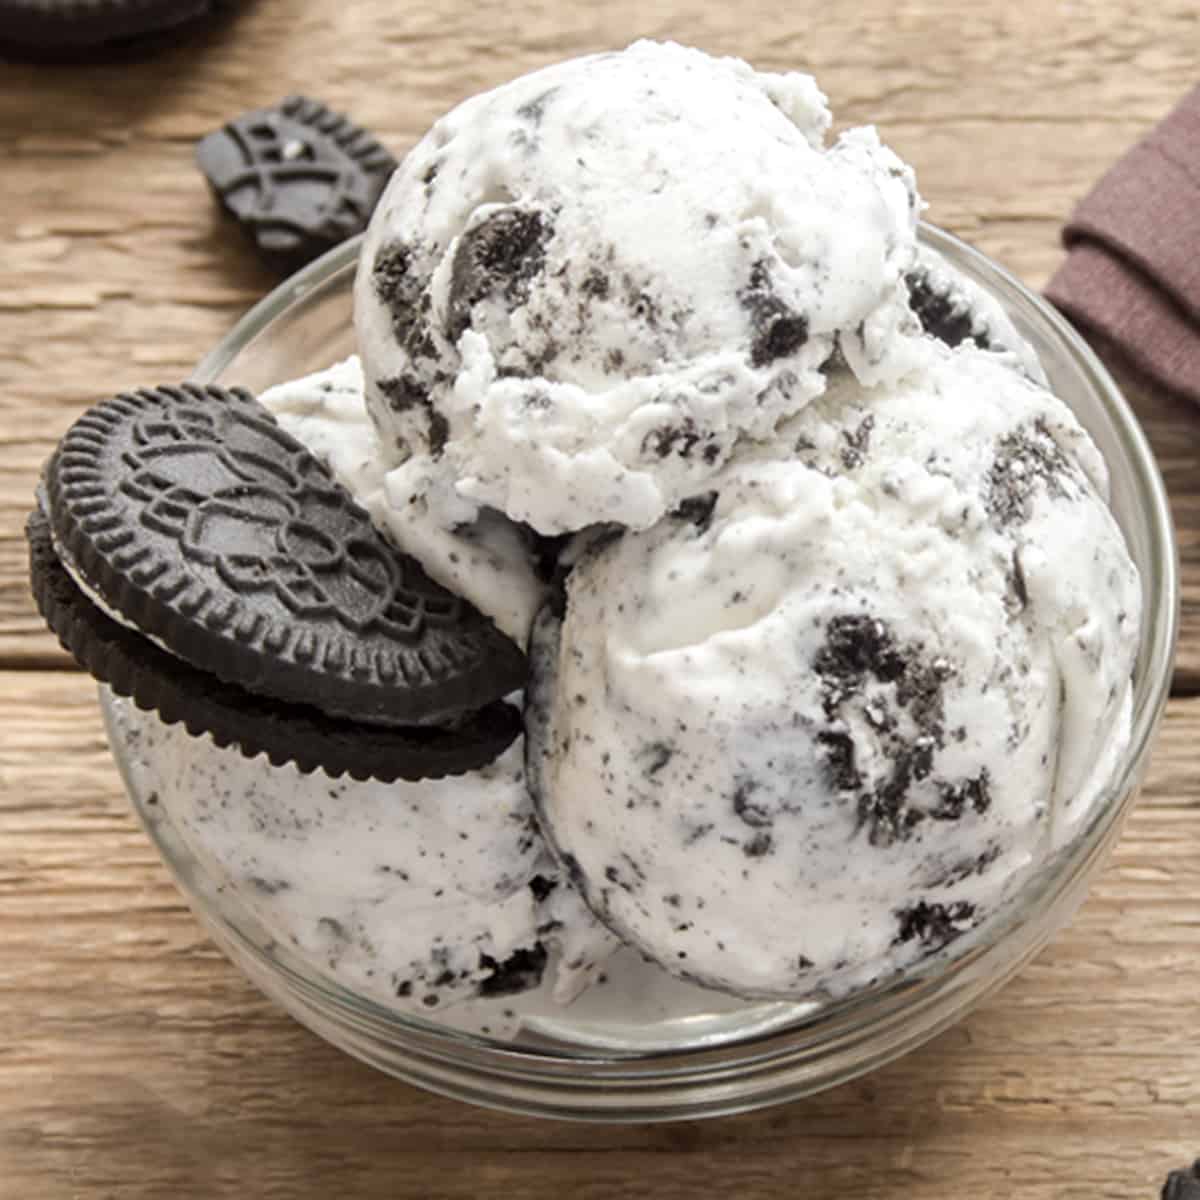
- Coarsely Chopped Oreos or Similar Cookies: The star of the show! Classic chocolate sandwich cookies (like Oreos) bring that iconic crunch, chocolatey flavor, and creamy filling contrast that defines cookies and cream ice cream. The key is to chop them coarsely – you want distinct pieces, not fine crumbs, for maximum textural impact. Feel free to experiment with different flavored sandwich cookies, or opt for gluten-free versions (many brands now offer excellent gluten-free chocolate sandwich cookies) to cater to dietary needs.
Crafting Your Culinary Masterpiece: A Step-by-Step Guide
Making this delicious
cookies and cream ice cream is surprisingly straightforward, even if you’re a novice with an ice cream maker. With a little preparation, you’ll be on your way to a homemade dessert that will impress everyone.
- Prepare Your Equipment: The success of churned ice cream heavily relies on cold. Ensure your ice cream maker's bowl has been in the freezer for at least 12-24 hours (or according to manufacturer instructions) until completely solid. A chilled mixing bowl for your base is also a clever trick to maintain a low temperature.
- Whisk the Base: In your chilled mixing bowl, combine the cold whole milk and granulated sugar. Whisk vigorously for a few minutes until the sugar is completely dissolved. It's crucial that no gritty sugar remains, as this can affect the texture. Once smooth, gently stir in the heavy cream and pure vanilla extract until everything is well blended and forms a homogenous, pale liquid. This easy "no-cook" method simplifies things considerably – no fussy tempering of eggs or constant stirring over heat required! For more insights into this simple technique, check out Unlock the Secret: Easy No-Cook Cookies & Cream Ice Cream at Home.
- Churn to Perfection: Pour the prepared mixture into the pre-frozen bowl of your ice cream maker. Churn according to your manufacturer's instructions. This typically takes around 20-30 minutes. The mixture will gradually thicken and expand, resembling a soft-serve consistency when it’s ready for the cookies.
- Add the Cookies: Once the base has reached a soft-serve consistency, stop the machine. Gently fold in the coarsely chopped cookies. You can either incorporate them fully into the churner for a few more minutes (just enough to distribute them, not pulverize them) or carefully layer them into your freezer-safe container along with the ice cream base as you transfer it. The goal is to have distinct cookie chunks throughout.
- Freeze to Set: Transfer the soft, churned cookies and cream ice cream to a freezer-safe container. Press a piece of parchment paper or plastic wrap directly onto the surface of the ice cream to prevent ice crystals from forming (this helps maintain that creamy texture!), then seal the container tightly with a lid. Place it in the freezer for at least 2-4 hours, or preferably overnight, until it’s firm enough to scoop beautifully.
Expert Tips for Your Best Cookies & Cream Ice Cream
To ensure your homemade
cookies and cream ice cream is nothing short of spectacular, consider these additional tips:
- Quality Matters: Since you're using only a handful of ingredients, the quality of each really shines through. Opt for good quality whole milk, fresh heavy cream, and pure vanilla extract for the best flavor.
- Temperature is Key: Always start with very cold ingredients for your base. The colder your mixture is before it hits the churner, the quicker and more efficiently your ice cream will freeze, resulting in a smoother texture.
- Don't Over-Churn: Churn until the ice cream reaches a soft-serve consistency. Over-churning can sometimes lead to a grainier texture or even cause your machine to overheat. The freezer will do the rest of the work.
- Cookie Size: Coarsely chopped cookies are essential. If they are too fine, they can dissolve into the base, turning your ice cream grey and losing that satisfying textural contrast. You want chunks, not crumbs!
- Storage Savvy: Store your ice cream in an airtight container to prevent freezer burn. For optimal enjoyment, consume homemade ice cream within two weeks, as it doesn't contain the stabilizers found in commercial versions and its texture can degrade over time.
- Serving Suggestion: For the perfect scoop, let your ice cream sit out on the counter for 5-10 minutes before serving. This allows it to soften slightly, making it easier to scoop and enhancing its creamy texture.
There's truly nothing quite like a scoop of rich, homemade
cookies and cream ice cream, especially when you know exactly what went into it. With just five simple ingredients, a little prep, and an ice cream maker, you can create a dessert that surpasses any store-bought alternative. Embrace the joy of crafting your own indulgent treats and get ready to savor every single creamy, cookie-filled spoonful. Your taste buds (and your family) will thank you!